A PHP Error was encountered

Severity: 8192

Message: Return type of CI_Session_null_driver::open($save_path, $name) should either be compatible with SessionHandlerInterface::open(string $path, string $name): bool, or the #[\ReturnTypeWillChange] attribute should be used to temporarily suppress the notice

Filename: drivers/Session_null_driver.php

Line Number: 6

Backtrace:

File: /home/ipsit/public_html/application/controllers/Articles.php
Line: 31
Function: __construct

File: /home/ipsit/public_html/index.php
Line: 315
Function: require_once

A PHP Error was encountered

Severity: 8192

Message: Return type of CI_Session_null_driver::close() should either be compatible with SessionHandlerInterface::close(): bool, or the #[\ReturnTypeWillChange] attribute should be used to temporarily suppress the notice

Filename: drivers/Session_null_driver.php

Line Number: 7

Backtrace:

File: /home/ipsit/public_html/application/controllers/Articles.php
Line: 31
Function: __construct

File: /home/ipsit/public_html/index.php
Line: 315
Function: require_once

A PHP Error was encountered

Severity: 8192

Message: Return type of CI_Session_null_driver::read($session_id) should either be compatible with SessionHandlerInterface::read(string $id): string|false, or the #[\ReturnTypeWillChange] attribute should be used to temporarily suppress the notice

Filename: drivers/Session_null_driver.php

Line Number: 8

Backtrace:

File: /home/ipsit/public_html/application/controllers/Articles.php
Line: 31
Function: __construct

File: /home/ipsit/public_html/index.php
Line: 315
Function: require_once

A PHP Error was encountered

Severity: 8192

Message: Return type of CI_Session_null_driver::write($session_id, $session_data) should either be compatible with SessionHandlerInterface::write(string $id, string $data): bool, or the #[\ReturnTypeWillChange] attribute should be used to temporarily suppress the notice

Filename: drivers/Session_null_driver.php

Line Number: 9

Backtrace:

File: /home/ipsit/public_html/application/controllers/Articles.php
Line: 31
Function: __construct

File: /home/ipsit/public_html/index.php
Line: 315
Function: require_once

A PHP Error was encountered

Severity: 8192

Message: Return type of CI_Session_null_driver::destroy($session_id) should either be compatible with SessionHandlerInterface::destroy(string $id): bool, or the #[\ReturnTypeWillChange] attribute should be used to temporarily suppress the notice

Filename: drivers/Session_null_driver.php

Line Number: 10

Backtrace:

File: /home/ipsit/public_html/application/controllers/Articles.php
Line: 31
Function: __construct

File: /home/ipsit/public_html/index.php
Line: 315
Function: require_once

A PHP Error was encountered

Severity: 8192

Message: Return type of CI_Session_null_driver::gc($maxlifetime) should either be compatible with SessionHandlerInterface::gc(int $max_lifetime): int|false, or the #[\ReturnTypeWillChange] attribute should be used to temporarily suppress the notice

Filename: drivers/Session_null_driver.php

Line Number: 11

Backtrace:

File: /home/ipsit/public_html/application/controllers/Articles.php
Line: 31
Function: __construct

File: /home/ipsit/public_html/index.php
Line: 315
Function: require_once

A PHP Error was encountered

Severity: Warning

Message: ini_set(): Session ini settings cannot be changed after headers have already been sent

Filename: Session/Session.php

Line Number: 284

Backtrace:

File: /home/ipsit/public_html/application/controllers/Articles.php
Line: 31
Function: __construct

File: /home/ipsit/public_html/index.php
Line: 315
Function: require_once

A PHP Error was encountered

Severity: Warning

Message: session_set_cookie_params(): Session cookie parameters cannot be changed after headers have already been sent

Filename: Session/Session.php

Line Number: 291

Backtrace:

File: /home/ipsit/public_html/application/controllers/Articles.php
Line: 31
Function: __construct

File: /home/ipsit/public_html/index.php
Line: 315
Function: require_once

A PHP Error was encountered

Severity: Warning

Message: ini_set(): Session ini settings cannot be changed after headers have already been sent

Filename: Session/Session.php

Line Number: 306

Backtrace:

File: /home/ipsit/public_html/application/controllers/Articles.php
Line: 31
Function: __construct

File: /home/ipsit/public_html/index.php
Line: 315
Function: require_once

A PHP Error was encountered

Severity: Warning

Message: ini_set(): Session ini settings cannot be changed after headers have already been sent

Filename: Session/Session.php

Line Number: 316

Backtrace:

File: /home/ipsit/public_html/application/controllers/Articles.php
Line: 31
Function: __construct

File: /home/ipsit/public_html/index.php
Line: 315
Function: require_once

A PHP Error was encountered

Severity: Warning

Message: ini_set(): Session ini settings cannot be changed after headers have already been sent

Filename: Session/Session.php

Line Number: 317

Backtrace:

File: /home/ipsit/public_html/application/controllers/Articles.php
Line: 31
Function: __construct

File: /home/ipsit/public_html/index.php
Line: 315
Function: require_once

A PHP Error was encountered

Severity: Warning

Message: ini_set(): Session ini settings cannot be changed after headers have already been sent

Filename: Session/Session.php

Line Number: 318

Backtrace:

File: /home/ipsit/public_html/application/controllers/Articles.php
Line: 31
Function: __construct

File: /home/ipsit/public_html/index.php
Line: 315
Function: require_once

A PHP Error was encountered

Severity: Warning

Message: ini_set(): Session ini settings cannot be changed after headers have already been sent

Filename: Session/Session.php

Line Number: 319

Backtrace:

File: /home/ipsit/public_html/application/controllers/Articles.php
Line: 31
Function: __construct

File: /home/ipsit/public_html/index.php
Line: 315
Function: require_once

A PHP Error was encountered

Severity: Warning

Message: ini_set(): Session ini settings cannot be changed after headers have already been sent

Filename: Session/Session.php

Line Number: 377

Backtrace:

File: /home/ipsit/public_html/application/controllers/Articles.php
Line: 31
Function: __construct

File: /home/ipsit/public_html/index.php
Line: 315
Function: require_once

A PHP Error was encountered

Severity: Warning

Message: session_set_save_handler(): Session save handler cannot be changed after headers have already been sent

Filename: Session/Session.php

Line Number: 110

Backtrace:

File: /home/ipsit/public_html/application/controllers/Articles.php
Line: 31
Function: __construct

File: /home/ipsit/public_html/index.php
Line: 315
Function: require_once

A PHP Error was encountered

Severity: Warning

Message: session_start(): Session cannot be started after headers have already been sent

Filename: Session/Session.php

Line Number: 143

Backtrace:

File: /home/ipsit/public_html/application/controllers/Articles.php
Line: 31
Function: __construct

File: /home/ipsit/public_html/index.php
Line: 315
Function: require_once

NRIPage | Articles | Refinishing Hardwood Floors | Get Opinions & View point. Dive Into Thought-Provoking Opinions & Insights - NRI Page
Edit

Refinishing Hardwood Floors

Refinishing Hardwood Floors

Refinishing Hardwood Floors: A DIY Guide

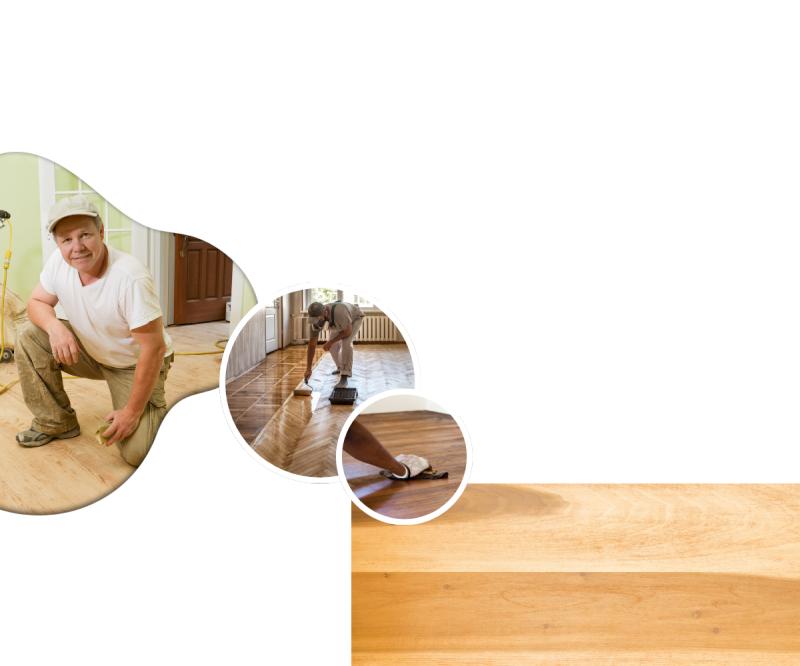
Refinishing hardwood floors can rejuvenate your home's appearance and extend the life of your flooring. This DIY project involves sanding away old finishes, repairing any damage, and applying a new finish to restore the wood's natural beauty. Here’s a step-by-step guide to help you through the process.

Materials and Tools You'll Need:

  • Sander: Drum sander or orbital sander for sanding the floors.
  • Sandpaper: Various grits (e.g., 60, 80, 120) for different stages of sanding.
  • Wood Filler: To repair cracks, dents, or holes.
  • Vacuum: To remove dust and debris between sanding and finishing.
  • Tack Cloth: For wiping away fine dust.
  • Finish: Choose between polyurethane, oil-based, or water-based finish.
  • Brushes or Rollers: For applying the finish.
  • Painter’s Tape: To protect baseboards and walls.
  • Protective Gear: Safety goggles, dust mask, and ear protection.

Step-by-Step Instructions:

  1. Prepare the Room:

    • Remove all furniture, rugs, and any other items from the room.
    • Remove baseboards if possible, or cover them with painter’s tape to protect them from dust and finish.
    • Ensure the room is well-ventilated, as sanding and finishing will produce dust and fumes.
  2. Inspect and Repair:

    • Check for any damage to the floor, such as cracks or loose boards.
    • Use wood filler to repair these areas. Apply the filler with a putty knife, press it into the cracks, and smooth it out. Allow it to dry according to the manufacturer’s instructions.
  3. Sand the Floors:

    • Start with a coarse-grit sandpaper (e.g., 60-grit) to remove the old finish and level the surface. Use the drum sander for large areas and an edge sander for corners and edges.
    • Sand in the direction of the wood grain to avoid scratches. Move the sander slowly and evenly.
    • After the initial sanding, switch to a medium-grit sandpaper (e.g., 80-grit) to smooth out the scratches from the coarse grit.
    • Finish with a fine-grit sandpaper (e.g., 120-grit) to achieve a smooth surface.
    • Vacuum thoroughly between each sanding stage to remove dust and debris.
  4. Clean the Floor:

    • After sanding, use a tack cloth to wipe down the floor and remove any remaining dust. Ensure the surface is completely clean and dry before proceeding to the next step.
  5. Apply the Finish:

    • Choose a finish based on your desired look and durability. Polyurethane is common for its durability and ease of application. Oil-based finishes provide a warm, amber tone but have a longer drying time and stronger odor. Water-based finishes are quick-drying and have a lower odor.
    • Stir the finish thoroughly before use. Avoid shaking the container, as this can create bubbles.
    • Use a brush or roller to apply a thin, even coat of finish, working in small sections. Apply the finish in the direction of the wood grain.
    • Allow the first coat to dry completely according to the manufacturer’s instructions. This typically takes 4-6 hours for water-based finishes and up to 24 hours for oil-based finishes.
    • Lightly sand between coats with a fine-grit sandpaper or a sanding sponge to ensure a smooth surface. Vacuum and wipe down with a tack cloth before applying the next coat.
    • Apply 2-3 coats of finish, depending on the desired level of protection and shine.
  6. Reinstall Baseboards and Replace Furniture:

    • Once the final coat of finish is completely dry (which can take several days), carefully remove the painter’s tape from the baseboards.
    • Reinstall the baseboards if you removed them.
    • Replace furniture and rugs, but avoid heavy traffic on the newly finished floors for at least a week to allow the finish to cure fully.
  7. Maintain Your Floors:

    • Regularly clean your hardwood floors with a dry or slightly damp mop to avoid excess moisture.
    • Use floor protectors on furniture legs to prevent scratches and dents.
    • Avoid using harsh chemicals or abrasive cleaners that can damage the finish.

Final Thoughts:

Refinishing hardwood floors can dramatically improve the appearance of your home and protect your investment in your flooring. With careful preparation, proper techniques, and patience, you can achieve professional-looking results. Enjoy your refreshed floors and the beauty they bring to your space!


What is your response?

joyful Joyful 0%
cool Cool 0%
thrilled Thrilled 0%
upset Upset 0%
unhappy Unhappy 0%
AD
AD